Secondly on the 19th fret, on the B string, the 20th fret is ever so slighty raised and gives a 'dead' note, odd its only on one string but a little attention is needed locally, the methods you are using here will help me in my quest to get these issues corrected......i'm always in search of perfection!!!
Mosrite Bass Clone: Project # 4
-
Bushers

- Valued Member
- Posts: 192
- Joined: Wed Jul 16, 2008 7:34 pm
- Location: Tulsa, OK (UK (Southampton) Expat)
Re: Mosrite Bass Clone: Project # 4
Thats very interesting, I have been playing my guitar for a few weeks now and in the process have spotted the odd 'in need of attention' items on the fretboard. Where the strings have sat for years on the zero fret, there are slight grooves cut in the wire that is noticable on bends as the wire 'pops out the groove', I'm thinking of filing the fret back to remove the groove, it shouldnt affect the play at all as it plays fine with strings in the groove currently, just dont want to take it back too far as that will mean a replacement fret wire if the strings rest on the first fret.
Secondly on the 19th fret, on the B string, the 20th fret is ever so slighty raised and gives a 'dead' note, odd its only on one string but a little attention is needed locally, the methods you are using here will help me in my quest to get these issues corrected......i'm always in search of perfection!!!
Secondly on the 19th fret, on the B string, the 20th fret is ever so slighty raised and gives a 'dead' note, odd its only on one string but a little attention is needed locally, the methods you are using here will help me in my quest to get these issues corrected......i'm always in search of perfection!!!
Jason (Bushers)
1965 Ventures II Model ~ #B233
1965 Ventures II Model ~ #B233
-
MWaldorf

- Site Admin
- Posts: 3264
- Joined: Sat May 24, 2008 1:21 pm
- Location: Alameda, California
- Contact:
Re: Mosrite Bass Clone: Project # 4
Danny,
Looking good! So when in the process do you create the space for the binding? Do you pre-cut the fretboard wood to be appropriately narrower than the neck before glueing them together or do you glue the fretboard to the neck and then route the edge?
Mel
Looking good! So when in the process do you create the space for the binding? Do you pre-cut the fretboard wood to be appropriately narrower than the neck before glueing them together or do you glue the fretboard to the neck and then route the edge?
Mel
Oy vey - it's MESHUGGA BEACH PARTY - The world's premier Jewish Surf Music Band!

What? Couldn't tell the logo is a link? So click here, what's the hold up? http://www.meshuggabeachparty.com
What? Couldn't tell the logo is a link? So click here, what's the hold up? http://www.meshuggabeachparty.com
-
dubtrub
- Administrator
- Posts: 3852
- Joined: Sun May 04, 2008 10:12 am
Re: Mosrite Bass Clone: Project # 4
Busher's you are right on the mark. Dress your frets as Mel described in his thread. You can tap the string guide with a small hammer and it should pop loose. Then use the 'big' file method the dress all the frets and zero fret nice and level. Round them over and sand them with 400 grit Emory paper then with steel wool, buff them smooth and shiny.
Yes, once I squared and trued the neck, I cut the fretboard about 1/16" ( the thickness of the binding) under sized before gluing it on. Once the binding is applied the sides are a perfect fit. Although I didn't show it in the photo's, this was a long and tedious process to get it right. There is no room for error.
Everything that I have described so for is intended for the novice or first time builder. Naturally there are tools and jigs that make the job easier and faster, but I am focusing on the one time or first time builder in an attempt to generate interest as well as confidence, in hopes that more will tackle the process of building their own, or at least be able to work on their own without having to pay enormous fee's to a luthier. There's a great deal of satifaction when 'doing it yourself'.
MWaldorf wrote:Danny,
Looking good! So when in the process do you create the space for the binding? Do you pre-cut the fretboard wood to be appropriately narrower than the neck before glueing them together or do you glue the fretboard to the neck and then route the edge?
Mel
Yes, once I squared and trued the neck, I cut the fretboard about 1/16" ( the thickness of the binding) under sized before gluing it on. Once the binding is applied the sides are a perfect fit. Although I didn't show it in the photo's, this was a long and tedious process to get it right. There is no room for error.
Everything that I have described so for is intended for the novice or first time builder. Naturally there are tools and jigs that make the job easier and faster, but I am focusing on the one time or first time builder in an attempt to generate interest as well as confidence, in hopes that more will tackle the process of building their own, or at least be able to work on their own without having to pay enormous fee's to a luthier. There's a great deal of satifaction when 'doing it yourself'.
Danny Ellison
-
dubtrub
- Administrator
- Posts: 3852
- Joined: Sun May 04, 2008 10:12 am
Re: Mosrite Bass Clone: Project # 4
Made quite a lot of progress today. I started off the morning trimming, leveling and dressing the frets. It took minimal amount of leveling but the crowning, dressing and polishing took several hours. Once I got that out of the way, it was on to more hard labor. I hate using rasps, files and sanding.
As you can see in this photo I started the rough shaping of the neck using a round cheese grader.

This photo is the finish rough shaping. Next the fun stuff of sanding for a few hours.

Finally, after about six hours of rough shaping and hand sanding I have a finished neck. Next up, I'll start on the body.


Danny Ellison
-
MWaldorf
- Site Admin
- Posts: 3264
- Joined: Sat May 24, 2008 1:21 pm
- Location: Alameda, California
- Contact:
Re: Mosrite Bass Clone: Project # 4
Danny,
Did you use calipers to determine the depth of the neck? If so, what did you go with? How would you describe the neck profile - is it something you shaped using a template or more by feel?
Mel
Did you use calipers to determine the depth of the neck? If so, what did you go with? How would you describe the neck profile - is it something you shaped using a template or more by feel?
Mel
Oy vey - it's MESHUGGA BEACH PARTY - The world's premier Jewish Surf Music Band!
What? Couldn't tell the logo is a link? So click here, what's the hold up? http://www.meshuggabeachparty.com
What? Couldn't tell the logo is a link? So click here, what's the hold up? http://www.meshuggabeachparty.com
-
dubtrub
- Administrator
- Posts: 3852
- Joined: Sun May 04, 2008 10:12 am
Re: Mosrite Bass Clone: Project # 4
MWaldorf wrote:Danny,
Did you use calipers to determine the depth of the neck? If so, what did you go with? How would you describe the neck profile - is it something you shaped using a template or more by feel?
Mel
No template and yes, I used calipers and a metal straight edge. I made it by feel, comparing it to my standard six string clones that I've built. Which by the way have very thin (slender ?) necks and very low action maybe even lower than on a Mosrite.
Danny Ellison
-
dubtrub
- Administrator
- Posts: 3852
- Joined: Sun May 04, 2008 10:12 am
Re: Mosrite Bass Clone: Project # 4
It's starting to look like a guitar. Well, sorta.
I said that I was not going to use any jigs or templates, but out of accuracy and expediency I made a quick template for the neck pocket by tracing around the base of the neck onto some scrap fiberboard. After determining that everything is going to line up where it is supposed to be, I began the routing process. Normally routing should be quick and easy. Not so when it comes to hard wood and dull router bites. You can see the burn marks throughout this entire project. All my tools including me should be retired permanently.

Here I have the neck pocket routed out and I'm starting on the control cavity. I drilled numerous holes to help eliminate so much wear and tear on my dull rounter bits.

Control cavity is done, so I routed the 1/2" cancave carve around the perimeter of the body. Next, I flip it over and routed a shallow 1/2" concave carve around the bottom side of the body, although I don't show it in the photo.

The pickup cavities were routed using the template for my standard guitars. You can see the reference lines for the center line and the bridge.

Here I set it on the work bench to sit back and gander at what I got myself in to.

Danny Ellison
-
Dennisthe Menace

- Moderator
- Posts: 4981
- Joined: Mon May 05, 2008 8:40 pm
- Location: Ft Lauderdale Florida
Re: Mosrite Bass Clone: Project # 4
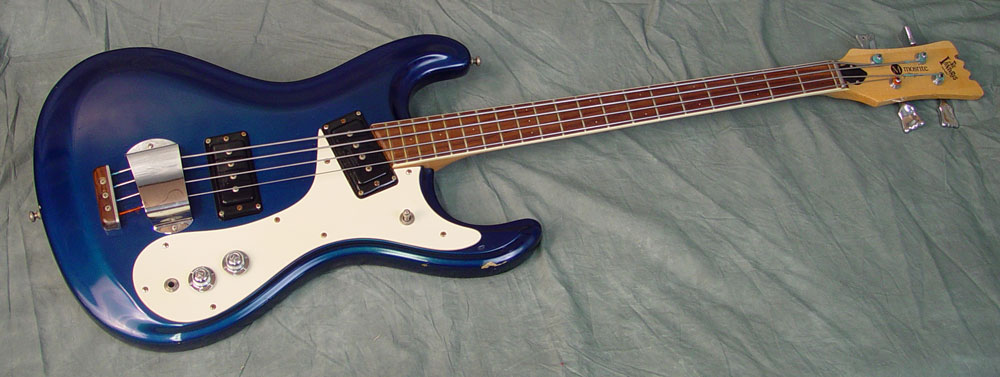
I see blue, I really do! I see Blue!!! 
make the Mos' of it, choose the 'rite stuff.
.........Owner of 9 Mosrites...
.....proud owner and documented:
1963 "the Ventures" Model s/n #0038
http://www.thevintagerockproject.com/
.........Owner of 9 Mosrites...
.....proud owner and documented:
1963 "the Ventures" Model s/n #0038
http://www.thevintagerockproject.com/
-
dubtrub
- Administrator
- Posts: 3852
- Joined: Sun May 04, 2008 10:12 am
Re: Mosrite Bass Clone: Project # 4
Dennisthe Menace wrote:I see blue, I really do! I see Blue!!!
Yeah! Me too. I keep going back to my photo files and drooling over this picture. Isn't that about the prettiest Mosrite bass you've ever seen?
Danny Ellison
-
Dennisthe Menace
- Moderator
- Posts: 4981
- Joined: Mon May 05, 2008 8:40 pm
- Location: Ft Lauderdale Florida
Re: Mosrite Bass Clone: Project # 4
Now....Imagine that....with a matching Headstock! 
make the Mos' of it, choose the 'rite stuff.
.........Owner of 9 Mosrites...
.....proud owner and documented:
1963 "the Ventures" Model s/n #0038
http://www.thevintagerockproject.com/
.........Owner of 9 Mosrites...
.....proud owner and documented:
1963 "the Ventures" Model s/n #0038
http://www.thevintagerockproject.com/
Return to “Mosrite & Clone, Projects, Parts & Accessories Q&A”
Who is online
Users browsing this forum: No registered users and 71 guests