Early Mosrite "German Carve" process
-
KRamone27

- Master Contributor
- Posts: 1325
- Joined: Mon May 05, 2008 1:38 pm
- Location: Carterville, IL
- Contact:
Re: Early Mosrite "German Carve" process
Very well put Danny. Me being a Union Carpenter also comes in handy as I use my strict tolerances and apply it to guitar building which gives me a great since of pride and accomplishment when I can stand back and look at what I created.
-
TerryTNM

- Top Producer
- Posts: 353
- Joined: Thu Jan 22, 2009 2:34 pm
- Location: Nashville, TN
- Contact:
Re: Early Mosrite "German Carve" process
Danny said:
"Terry, can you tell us a little bit about binding? Do you use individual strips of white and black, then laminate them yourself, or do you have a source for ready made binding? Any photo's of this process."
Danny,
For the headcaps I use triple binding that comes ready laminated. For the fingerboards I start with double binding white/black. I put this on before the board is radius-ed or the frets are put in. After the frets are in the 3rd white strip is applied. On occasion I'll put the white/black strips, cut the frets through, then the outside white strip. I then radius the fingerboard then notch the fret ends over the binding. This gives a little more fret area on the edges. . For the body, so far I've only used single thickness as did Semie on the originals.
The series below shows the headcap binding pre-bent on a Corian form. This is a process I do in the kitchen with a pot of boiling water. The triple binding is very thick and does not form well without plenty of heat. The second shot is preparing to do the final heat bends on the last bit of binding. This is done with a heat gun and last is the finished item with the "M" glued in and sanded down.


As far as applying the binding there are some 'binding being applied' photos among the "progress" photos on some of the previous guitars. I've use a variety of glues for this process. I really like the white liquid binding glue from Luthier's Mercantile but still use "Crazy Glue" with a drying agent for the very hard to hold areas. Rubber bands, tape, clamps are all used to hold it in place.
I get most of my binding from Bill James at Axiom Inc. http://www.axinc.net/storefront/ He's a really good guy.
Thanks for your interest - Terry
"Terry, can you tell us a little bit about binding? Do you use individual strips of white and black, then laminate them yourself, or do you have a source for ready made binding? Any photo's of this process."
Danny,
For the headcaps I use triple binding that comes ready laminated. For the fingerboards I start with double binding white/black. I put this on before the board is radius-ed or the frets are put in. After the frets are in the 3rd white strip is applied. On occasion I'll put the white/black strips, cut the frets through, then the outside white strip. I then radius the fingerboard then notch the fret ends over the binding. This gives a little more fret area on the edges. . For the body, so far I've only used single thickness as did Semie on the originals.
The series below shows the headcap binding pre-bent on a Corian form. This is a process I do in the kitchen with a pot of boiling water. The triple binding is very thick and does not form well without plenty of heat. The second shot is preparing to do the final heat bends on the last bit of binding. This is done with a heat gun and last is the finished item with the "M" glued in and sanded down.
As far as applying the binding there are some 'binding being applied' photos among the "progress" photos on some of the previous guitars. I've use a variety of glues for this process. I really like the white liquid binding glue from Luthier's Mercantile but still use "Crazy Glue" with a drying agent for the very hard to hold areas. Rubber bands, tape, clamps are all used to hold it in place.
I get most of my binding from Bill James at Axiom Inc. http://www.axinc.net/storefront/ He's a really good guy.
Thanks for your interest - Terry
-
MWaldorf

- Site Admin
- Posts: 3264
- Joined: Sat May 24, 2008 1:21 pm
- Location: Alameda, California
- Contact:
Re: Early Mosrite "German Carve" process
Terry,
All the photos of the process on your site are great illustrations of the process. As an amateur, I can understand how you do what you do, but certainly couldn't replicate it. As Danny mentioned, I'm proud of what I accomplished with my parts-rite and I'm happy with the way it plays. I've thought about another project, but without the investment in some real woodworking and finishing tools I've probably gotten about as far as I could get. To me, seeing the craftsmanship that goes into the guitars you and others here have built (Ed Elliot's Panama Lane guitars, Danny's "Vintage" models, Garrett's sidejack) only makes me more impressed with the final product.
Mel
Oy vey - it's MESHUGGA BEACH PARTY - The world's premier Jewish Surf Music Band!

What? Couldn't tell the logo is a link? So click here, what's the hold up? http://www.meshuggabeachparty.com
What? Couldn't tell the logo is a link? So click here, what's the hold up? http://www.meshuggabeachparty.com
-
Dennisthe Menace

- Moderator
- Posts: 4981
- Joined: Mon May 05, 2008 8:40 pm
- Location: Ft Lauderdale Florida
Re: Early Mosrite "German Carve" process
MWaldorf wrote:Terry,
All the photos of the process on your site are great illustrations of the process. As an amateur, I can understand how you do what you do, but certainly couldn't replicate it. As Danny mentioned, I'm proud of what I accomplished with my parts-rite and I'm happy with the way it plays. I've thought about another project, but without the investment in some real woodworking and finishing tools I've probably gotten about as far as I could get. To me, seeing the craftsmanship that goes into the guitars you and others here have built (Ed Elliot's Panama Lane guitars, Danny's "Vintage" models, Garrett's sidejack) only makes me more impressed with the final product.
Mel
.............one word Mel...........DITTO............that's all...............
make the Mos' of it, choose the 'rite stuff.
.........Owner of 9 Mosrites...
.....proud owner and documented:
1963 "the Ventures" Model s/n #0038
http://www.thevintagerockproject.com/
.........Owner of 9 Mosrites...
.....proud owner and documented:
1963 "the Ventures" Model s/n #0038
http://www.thevintagerockproject.com/
-
dubtrub
- Administrator
- Posts: 3852
- Joined: Sun May 04, 2008 10:12 am
Re: Early Mosrite "German Carve" process
Terry, there is obviously a tremendous amount of work that goes into building a guitar of this caliber. I can only imagine the skill it takes in the building process. Thanks for the explanation and great photo's.
Have you ever kept track of the hours spent in constructing one of these? Do you build at home in a shop or do you have a commercial building?
Have you ever kept track of the hours spent in constructing one of these? Do you build at home in a shop or do you have a commercial building?
Danny Ellison
-
TerryTNM
- Top Producer
- Posts: 353
- Joined: Thu Jan 22, 2009 2:34 pm
- Location: Nashville, TN
- Contact:
Re: Early Mosrite "German Carve" process
Thanks all for the kind words. I really appreciate it.
Danny,
On a few of the guitars I kept a running log book on just what I did on a particular day but didn't track the hours. The hours really don't mean that much to me. Being able to do this kind of work is so fulfilling to me. And I thank my wife Elsie for putting up with my passion. The doublenecks at this point take about 9-10 months but I'm not punching a clock for 8 hour days plus there is usually 2 or 3 projects going on at the same time. One other point. On top of the 9-10 month construction time is another month for the lacquer finish to dry to the point it can be polished. If I worked with a polyester or urethane type material drying time would be only a few days or less. But so far no one want's it.
I have a very nice little shop in the back of our home. About the size of a 4 car garage. I'll take some pictures of it at some point when it's clean
Thank you all - Terry
-
EFElliott
- Top Producer
- Posts: 502
- Joined: Fri Jun 20, 2008 8:35 pm
- Location: Checotah, Oklahoma USA
- Contact:
Re: Early Mosrite "German Carve" process
Hey Terry,
I like your spoon plane, I've never seen one before, pretty cool.
My "German Carve" starts pretty much like yours, routing a cove
cut around the body, a few pencil marks, then I take an electric
drill with a 36 gt grinding
disk to remove most of the wood, then finish up with a palm sander.
I have a big shaper and pin router that belonged to Semie, but the're
3 phase and I have'nt got them wired up yet, I'm getting a phase converter
here soon so I can run them on 220, so it's pretty much my small tools and
a lot of hand work at this time.
I went to WoodCraft in Tulsa today and bought the wood to start 4 new
guitars, I'm going to post Progress photos on the Forum.
Buy the way, Love your guitars, you do some beautiful work!
Ed Elliott
-
KRamone27
- Master Contributor
- Posts: 1325
- Joined: Mon May 05, 2008 1:38 pm
- Location: Carterville, IL
- Contact:
Re: Early Mosrite "German Carve" process
How far from Tulsa are you Ed?
-
TerryTNM
- Top Producer
- Posts: 353
- Joined: Thu Jan 22, 2009 2:34 pm
- Location: Nashville, TN
- Contact:
Re: Early Mosrite "German Carve" process
EFElliott wrote:Hey Terry,
I like your spoon plane, I've never seen one before, pretty cool.
My "German Carve" starts pretty much like yours, routing a cove
cut around the body, a few pencil marks, then I take an electric
drill with a 36 gt grinding
disk to remove most of the wood, then finish up with a palm sander.
I have a big shaper and pin router that belonged to Semie, but the're
3 phase and I have'nt got them wired up yet, I'm getting a phase converter
here soon so I can run them on 220, so it's pretty much my small tools and
a lot of hand work at this time.
I went to WoodCraft in Tulsa today and bought the wood to start 4 new
guitars, I'm going to post Progress photos on the Forum.
Buy the way, Love your guitars, you do some beautiful work!
Ed Elliott
Hey Ed,
Thank you for the kind words.
Which ever way works the best is the way to do it. The disk sander doesn't work that well for me on the maple. If you're working in Bass wood I can see that a toothy sanding disk would work just fine. Let us know with pictures when you get your pin router and shaper up and running. I'll be looking forward to your progress shots of your new guitars.
It's nice to touch bases with you. I have seen your name in connection with your pickups on Ebay for a long time.
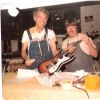
BTW I snagged your picture with you holding Larry's guitar at the Mosrite shop. Hope you don't mind.
-Terry
-
Bushers

- Valued Member
- Posts: 192
- Joined: Wed Jul 16, 2008 7:34 pm
- Location: Tulsa, OK (UK (Southampton) Expat)
Re: Early Mosrite "German Carve" process
KRamone27 wrote:How far from Tulsa are you Ed?
He's in Checotah Kevin, about 70 miles away. Ed, you really need to give me a shout when you're in Tulsa again, I'll buy you a coffee!!
Jason (Bushers)
1965 Ventures II Model ~ #B233
1965 Ventures II Model ~ #B233
Return to “Mosrite & Clone, Projects, Parts & Accessories Q&A”
Who is online
Users browsing this forum: No registered users and 259 guests