Hi.
The day has come. I have started building my own guitar.
I should say it is 'inspired by Mosrite', becouse there's no way I could build a good replica with my knowledge or budget.
Also, in the end, it will probably be closer to Univox, becouse the details are easier to build on that one. No zero fret. It'll also be hard-tail. But it should be close enough for first time
The budget is also ridiculously low - it has to be under 150€. So far so good.
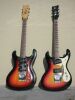
Anyway, this http://www.strat-talk.com/forum/guitar-vendors/20316-my-mdf-johnny-ramone-mosrite-pic-heavy.html
has been my inspiration.
I have a bit of experience rebuilding old cars and bikes, but almost none with woodwork...
So first I bought a cheap - but- decent -for - hobby - use router. I had most of other tools required from before. So far I didn't really need that much except sander and drill...
Then, after no luck finding a cheap neck with 3 per side tuners, I ordered a Harley Benton SG. It's 88€ brand new and I can use all the bits.
These actually have very decent hardware. But terrible electronics...
I am a huge SG fan, but already have a couple, so this one was played for about 5 minutes before disassembling:
Soooo.... the body material... I didn't wanna use MDF or plywood, but still wanted the wood to be as cheap as possible. So I bought two spruce shelves and glued them together... 3,6€...
I might as well stuck with MDF, as I found out later...
But this is mostly learning experience, and if it turns out OK, I can always make another one from proper wood later...
Made a template for body and neck pocket.
The pocket turned out pretty good, considering it's the first time I used a router...
Here's a quick mock-up with the parts...
It even passed the 'test':
Then I cut out the body...
Lookin' good (reasonably):
Then I routed it out. I finished the area around neck pocket later, mostly by hand becouse I was afraid the router would rip out the thin areas...
Of course, I screwed up. 3 times, actually. First I learned a lesson about patience: even though the template looks smooth, it has to feel smooth too, otherwise the body will look like it was cut out with scissors.
Could be worse, and not too terrible for first time, and cheap spruce, but I see a lot of sanding in my future...
Then, as I said, it was the first time I used a router, and I learned the hard way it's a bad idea to be touching the wood with the router bit at the moment you turn it on...
Torn away a chunk of upper horn as well, but I managed to glue it back.
But I'm pretty pleased with the progress, that's quite a lot for a beginner, in only 2 afternoons...
I covered my screw-ups with filler and I'll let it dry now. To be continued next week.
Mosrite mkI / univox project - beware! Beginner at work.
-
- Regular Member
- Posts: 10
- Joined: Thu Feb 07, 2013 10:46 am
- Location: Slovenia
- Contact:
- MWaldorf
- Site Admin
- Posts: 3264
- Joined: Sat May 24, 2008 1:21 pm
- Location: Alameda, California
- Contact:
Re: Mosrite mkI / univox project - beware! Beginner at work.
Cool project! I learned a similar lesson when I got my router, only it was the surface of my table saw that got the "kiss". Either way, far better than if it too a bite out of you!
Oy vey - it's MESHUGGA BEACH PARTY - The world's premier Jewish Surf Music Band!
What? Couldn't tell the logo is a link? So click here, what's the hold up? http://www.meshuggabeachparty.com
- panther
- Top Producer
- Posts: 817
- Joined: Tue May 03, 2011 8:31 pm
- Location: Anza, California
- Contact:
Re: Mosrite mkI / univox project - beware! Beginner at work.
Happy-Tom;
Here is project I did a couple years back, maybe some hints for you.
Especially the Zero fret option. That's a must. The tremolo was inspired by Danny. I thought way out of my league but once going, it wasn't.
Dan
viewtopic.php?f=20&t=4264
Here is project I did a couple years back, maybe some hints for you.
Especially the Zero fret option. That's a must. The tremolo was inspired by Danny. I thought way out of my league but once going, it wasn't.
Dan
viewtopic.php?f=20&t=4264
"The More People I Meet, The More I Miss My Dog"
- panther
- Top Producer
- Posts: 817
- Joined: Tue May 03, 2011 8:31 pm
- Location: Anza, California
- Contact:
Re: Mosrite mkI / univox project - beware! Beginner at work.
happy-Tom;
Any news or updates ?
Dan
Any news or updates ?
Dan
"The More People I Meet, The More I Miss My Dog"
-
- Regular Member
- Posts: 10
- Joined: Thu Feb 07, 2013 10:46 am
- Location: Slovenia
- Contact:
Re: Mosrite mkI / univox project - beware! Beginner at work.
Hey. I'm abroad at the moment, but before I left I did manage to install the bridge & the strings to see if it plays at all.
Turned out I was pretty lucky. The neck only needed a tiny bit of shimming to get a better angle, and the intonation coukld not be better.
I did manage to mess up the tailpiece, it was a tiny bit crooked. It didn't affect playing ot tuning at all, you can't even see it unless you really look for it. But I know it's there, and the holes were a bit too large, due to a poor drill, so I plugged up the tailpiece holes and I'll do it again.
Otherwise I sorted out most of the cosmetic screw ups - and made some new ones along the way...
The horns are a bit strange and will need some more sanding, and the neck plate is crooked, so I just plugged the holes and I'm doing it again.
But other than that, it feels surprisingly good.
I had to splat on just a little paint, as you can see... well, sort of. It's gonna be slightly 'aged' metallic blue.
I'll have a week off in the beginning of May and I expect some major progress then
- panther
- Top Producer
- Posts: 817
- Joined: Tue May 03, 2011 8:31 pm
- Location: Anza, California
- Contact:
Re: Mosrite mkI / univox project - beware! Beginner at work.
Keep us updated.
Dan
Dan
"The More People I Meet, The More I Miss My Dog"
- BRRanger
- Top Producer
- Posts: 645
- Joined: Tue Sep 18, 2012 10:14 am
- Location: California/Central Valley
- Contact:
Re: Mosrite mkI / univox project - beware! Beginner at work.
"and the neck plate is crooked, so I just plugged the holes and I'm doing it again."
No fear, if I had drilled holes in it, it would look like a shotgun target!
Scott
No fear, if I had drilled holes in it, it would look like a shotgun target!
Scott
-
- Senior Member
- Posts: 115
- Joined: Wed Sep 12, 2012 6:22 pm
- Location: Danville, California
- Contact:
Re: Mosrite mkI / univox project - beware! Beginner at work.
good luck with your project- looking good!
Kathy
Kathy
-
- Regular Member
- Posts: 10
- Joined: Thu Feb 07, 2013 10:46 am
- Location: Slovenia
- Contact:
Re: Mosrite mkI / univox project - beware! Beginner at work.
Allright, so I made some progress.
I have roughly finished the headstock. This is as good as it gets, becouse the original paddle was too small anyway. I hsitated between mosrite and univox style, so I went middle of the road: i copied Eastwood Hi -flier Phase 4. So a copy of a copy... Well, it looks pretty M to me.. Also, the routing is done. Not as neat as I hoped, but ok.
Then DISASTER struck While knocking the tailpiece bushings in with a rubber mallet, the body broke in two. I'm now officialy a retard I could press them in with a clamp, but that didn't cross my mind then...
You see, this is why I refused to use proper wood for my first build.
Of course on the other hand, cheap not-for-instruments wood was the reason this happened in the first place.
as it turned out the main reason for the break was that the glue in the multi-piece body gave up.
So I just glued it back together like this:
Another 24 hours wasted for stupid mistakes... Oh well, a lesson learned,
and the next day the body was as good as new.
So I put everything together, made a pickguard realy quickly (need to buy proper material, but some soft plastic will do for test drive),
and wired & set up the whole thing really in a matter of minutes, becouse I was late for band practice and was determined to test it there.
Which I did. It works. It stays in tune (relatively). Feels great. Sounds good too, but I gotta rewire it, becouse pots work in reverse.
As you can see, I also forgot to drill the hole for bridge ground wire... And didn't have time for strap buttons.
Well, there's still a lot of work to be done, especially sanding to smooth out those amateurish edges,
but at least I know I have a working guitar now and won't have to again start from scratch... yet.
- MWaldorf
- Site Admin
- Posts: 3264
- Joined: Sat May 24, 2008 1:21 pm
- Location: Alameda, California
- Contact:
Re: Mosrite mkI / univox project - beware! Beginner at work.
Congratulations - it looks like a mean tone machine!
Oy vey - it's MESHUGGA BEACH PARTY - The world's premier Jewish Surf Music Band!
What? Couldn't tell the logo is a link? So click here, what's the hold up? http://www.meshuggabeachparty.com
Return to “Mosrite & Clone, Projects, Parts & Accessories Q&A”
Who is online
Users browsing this forum: No registered users and 59 guests