Ok, so here it is. After completly stripping (apart from removing the neck) and cleaning this guitar I have here the finished product. I re-chromed the tremelo arm as it was looking pretty tired, replaced the vibrato bar with one from Hallmark and custom made (myself) stepped pins to suit (the holes in the Hallmark piece are .200" dia and the orginals are .190").
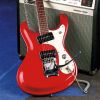
I brought back to life the body using Meguiar's Scratch X (photo doesn't really do it justice), a great product that restored the guitar back to its original luster!
Now on to playing, I'm looking forward to every moment I can get on and play!
Finshed Project: Ventures II
- Bushers
- Valued Member
- Posts: 192
- Joined: Wed Jul 16, 2008 7:34 pm
- Location: Tulsa, OK (UK (Southampton) Expat)
- Contact:
Finshed Project: Ventures II
Jason (Bushers)
1965 Ventures II Model ~ #B233
- dubtrub
- Administrator
- Posts: 3795
- Joined: Sun May 04, 2008 10:12 am
- Contact:
Re: Finshed Project
What a beauty! Congrats Jason on restoring it to perfection.
I know you must be proud because that picture is HUGE. But that's OK, I'd be proud too.
Danny Ellison
- Bushers
- Valued Member
- Posts: 192
- Joined: Wed Jul 16, 2008 7:34 pm
- Location: Tulsa, OK (UK (Southampton) Expat)
- Contact:
Re: Finshed Project
lol, more clarity/detail in larger sizes! If it was wider than the average screen I'd have made it smaller, originally I had, so for those who dont like to scroll to view it all, enjoy;
Jason (Bushers)
1965 Ventures II Model ~ #B233
- Dennisthe Menace
- Moderator
- Posts: 4981
- Joined: Mon May 05, 2008 8:40 pm
- Location: Ft Lauderdale Florida
- Contact:
Re: Finshed Project
Brother, that came out darn SWEEEEET!!! Nice Job on the Detailing...Meguiars Scratch X, huh..??
Well if your not busy next weekend, I've got a few GTs with some minor scratches that might need....
J/K!!! the Menace....
Well if your not busy next weekend, I've got a few GTs with some minor scratches that might need....
J/K!!! the Menace....
make the Mos' of it, choose the 'rite stuff.
.........Owner of 9 Mosrites...
.....proud owner and documented:
1963 "the Ventures" Model s/n #0038
http://www.thevintagerockproject.com/
.........Owner of 9 Mosrites...
.....proud owner and documented:
1963 "the Ventures" Model s/n #0038
http://www.thevintagerockproject.com/
- dubtrub
- Administrator
- Posts: 3795
- Joined: Sun May 04, 2008 10:12 am
- Contact:
Re: Finshed Project
Jason, can you explain a little clearer regarding the step down pins? Are there individual pins on each side of the assembly that the rocker rides on? My experience has only been with a solid pin all the way the rocker. However, I have seen the patent drawings showing individual pins on each side. If that is the case, how do you assemble it with a larger diameter on the rocker and a smaller diameter step down on the bearing side of the assembly? Or, am I totally confused.
Danny Ellison
- MWaldorf
- Site Admin
- Posts: 3264
- Joined: Sat May 24, 2008 1:21 pm
- Location: Alameda, California
- Contact:
Re: Finshed Project
Bushers,
Looks fantastic! Where did you get the chroming done?
Mel
Looks fantastic! Where did you get the chroming done?
Mel
Oy vey - it's MESHUGGA BEACH PARTY - The world's premier Jewish Surf Music Band!
What? Couldn't tell the logo is a link? So click here, what's the hold up? http://www.meshuggabeachparty.com
- Bushers
- Valued Member
- Posts: 192
- Joined: Wed Jul 16, 2008 7:34 pm
- Location: Tulsa, OK (UK (Southampton) Expat)
- Contact:
Re: Finshed Project
dubtrub wrote:Jason, can you explain a little clearer regarding the step down pins? Are there individual pins on each side of the assembly that the rocker rides on? My experience has only been with a solid pin all the way the rocker. However, I have seen the patent drawings showing individual pins on each side. If that is the case, how do you assemble it with a larger diameter on the rocker and a smaller diameter step down on the bearing side of the assembly? Or, am I totally confused.
Correct, there are 2 pins, one either side of the vibrato. The larger diameter (because I have the Hallmark Vibrato) is installed into the vibrato then the roller bearing onto the shaft and the housing of the tailpiece plate, after that you insert the top pin and then the bearing. Pretty easy install really, as I made the bottom pin tight in the housing (if they're both tight and you cant remove one, you wont get the vibrato out of the tailpiece after removing the bearings) it wont fall out when you're trying to put everything together.
To remove, simply drop out the bearings and pull out one of the pins (top one in my case).
I had the chroming done locally here at C&F Custom chrome, though the guy took forever! I dont think I'd use him again as it wasnt as 'perfect' as I'd like! (as an engineer my standards are pretty high though!)
Jason (Bushers)
1965 Ventures II Model ~ #B233
Return to “Mosrite & Clone, Projects, Parts & Accessories Q&A”
Who is online
Users browsing this forum: No registered users and 155 guests