Ed Elliott, Step-by-Step Building of 4 Mosrite Custom Clones
-
MWaldorf

- Site Admin
- Posts: 3264
- Joined: Sat May 24, 2008 1:21 pm
- Location: Alameda, California
- Contact:
Re: Ed Elliott, Step-by-Step Building of 4 Mosrite Custom Clones
Incredible! Thank you Ed for sharing the construction process with us.
Oy vey - it's MESHUGGA BEACH PARTY - The world's premier Jewish Surf Music Band!

What? Couldn't tell the logo is a link? So click here, what's the hold up? http://www.meshuggabeachparty.com
What? Couldn't tell the logo is a link? So click here, what's the hold up? http://www.meshuggabeachparty.com
-
sleeperNY
- Top Producer
- Posts: 731
- Joined: Tue May 06, 2008 7:38 am
- Location: Central NY
Re: Ed Elliott, Step-by-Step Building of 4 Mosrite Custom Clones
This is a great Ed. Thanks .
Jim
Jim
Gretsch-6122-58
Gretsch-6122-59
Gretsch-6120-vs-55
NOS Partsright Mosrite by Jim
Hallmark 60 Custom
Fender Twin Custom 15 Fender Tone Master Twin
Fender Bassman 59 LTD
Peavey Delta Blues
Korg AX3000G
Gretsch-6122-59
Gretsch-6120-vs-55
NOS Partsright Mosrite by Jim
Hallmark 60 Custom
Fender Twin Custom 15 Fender Tone Master Twin
Fender Bassman 59 LTD
Peavey Delta Blues
Korg AX3000G
-
Veenture

- Master Contributor
- Posts: 4127
- Joined: Sat Jan 03, 2009 12:07 pm
- Location: The Netherlands
Re: Ed Elliott, Step-by-Step Building of 4 Mosrite Custom Clones
...  ...sigh...'the end'. Just kidding. It's a shame to think that some belt buckle might soon be rubbing up against that lovely finish.
I'll look after one for you Ed, (I bags the one in the HSC guys)
THANK YOU mister...err...MASTER Ed!
(dear oh dear, perchance to dream... guess I'll have to wait for the publication of Eddy's upcoming book [hint, hint]...)
I'll look after one for you Ed, (I bags the one in the HSC guys)
THANK YOU mister...err...MASTER Ed!
(dear oh dear, perchance to dream...
-
gplayer

- Top Producer
- Posts: 433
- Joined: Sat Dec 27, 2008 4:36 am
- Location: Fl
Re: Ed Elliott, Step-by-Step Building of 4 Mosrite Custom Clones
Beautiful work, Ed. Personally, I'd like the set neck. 
-
dubtrub
- Administrator
- Posts: 3852
- Joined: Sun May 04, 2008 10:12 am
Re: Ed Elliott, Step-by-Step Building of 4 Mosrite Custom Clones
Hey Ed,
I have taken all your photo's and broken them down into individual steps of construction and created a special topic in your name for easy access to a specific step of the construction. I then made the topic a sticky post and locked it to keep it from getting cluttered. However, I have made each step it's on individual topic and posted them elsewhere here in the project section under your name so they can be discussed individually if anyone so desires. They are each titled Step #1 through ?. They are all dated in January so they will be found several pages back.
Go ahead and continue posting your photo's to your original topic and I will seperate them and add to your photo essay post that I created. Please be sure to include a segment on your mistake plate guitars and pickup winding.
viewtopic.php?f=20&t=1581
Danny Ellison
-
ltdave32
- Regular Member
- Posts: 10
- Joined: Mon Jan 25, 2010 5:10 pm
- Location: California
Re: Ed Elliott, Step-by-Step Building of 4 Mosrite Custom Clones
Ed, can you elaborate on exactly how you get the binding over the fret ends, such as in this photo?
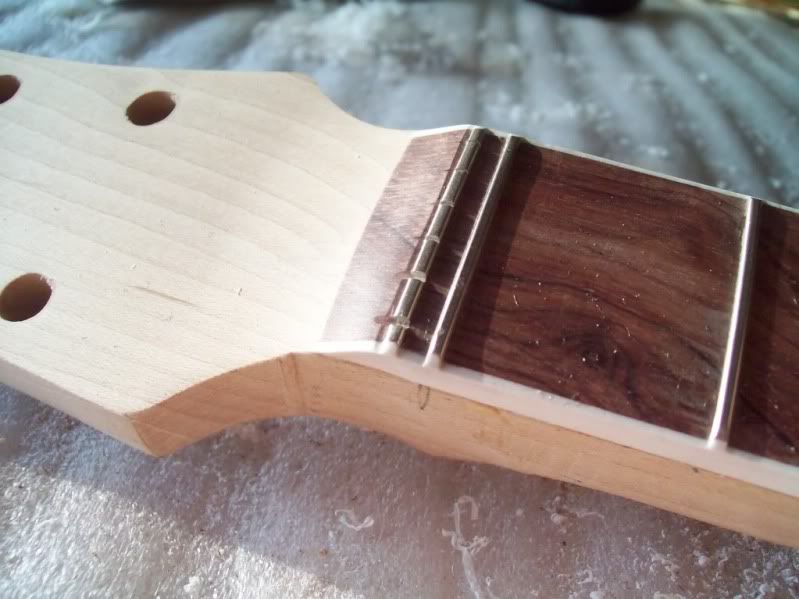
It looks as if there's just a wee bit of binding "skin" over the outside ends of the frets. How this is done has always eluded me, and I can't find any "how-to's" on the net..
Dave
It looks as if there's just a wee bit of binding "skin" over the outside ends of the frets. How this is done has always eluded me, and I can't find any "how-to's" on the net..
Dave
-
dubtrub
- Administrator
- Posts: 3852
- Joined: Sun May 04, 2008 10:12 am
Re: Ed Elliott, Step-by-Step Building of 4 Mosrite Custom Clones
ltdave32 wrote:Ed, can you elaborate on exactly how you get the binding over the fret ends, such as in this photo?
Dave
Ed, doesn't visit the forum much anymore, so I'll explain. With the binding glued in place it is taller than the side of the fretboard and the frets. Simply use an Exacto knife to shave or file down the binding to fretboard level then shave/file shape the edge of the binding to form the rounded end of the fret which is cut flush with the fretboard. If using a file, it's better to file close to finish dimension then use a scraper to dress the binding down flush, otherwise the file may cut into the fretboard.
Danny Ellison
-
GattonFan

- Master Contributor
- Posts: 1287
- Joined: Tue Aug 26, 2008 6:36 pm
- Location: St Louis area
Re: Ed Elliott, Step-by-Step Building of 4 Mosrite Custom Clones
Eddy's had computer problems - I called him to see about some p'ups, and his computer's down ...
dennis
dennis
So many guitars; So little time ..
-
ltdave32
- Regular Member
- Posts: 10
- Joined: Mon Jan 25, 2010 5:10 pm
- Location: California
Re: Ed Elliott, Step-by-Step Building of 4 Mosrite Custom Clones
dubtrub wrote:ltdave32 wrote:Ed, can you elaborate on exactly how you get the binding over the fret ends, such as in this photo?
Dave
Ed, doesn't visit the forum much anymore, so I'll explain. With the binding glued in place it is taller than the side of the fretboard and the frets. Simply use an Exacto knife to shave or file down the binding to fretboard level then shave/file shape the edge of the binding to form the rounded end of the fret which is cut flush with the fretboard. If using a file, it's better to file close to finish dimension then use a scraper to dress the binding down flush, otherwise the file may cut into the fretboard.
dubtrub, thanks for the tips!
..Another thing, I noticed that the fret end seems buried "into" the binding somewhat. Should I assume that the binding is "melted" over the fret end with acetone? I get the part where the binding is installed taller than the fret side and pushed up against the fret ends, then shaved down between the frets, but as in the above photo (and as well on my Gibson acoustic) it appears that the top of the fret ends are covered with binding, as well as the sides. Any thoughts on this?
Oh, wait a sec...
"shave/file shape the edge of the binding to form the rounded end of the fret which is cut flush with the fretboard."
So, you're saying that the fret end is cut flush with the side of actual fretboard, then the beveled edge that appears to be the beveled edge of the fret end is actually made of binding material, and filed and beveled to appear to be a covered fret end..
AHA!!!! THE LIGHT BULB WENT ON IN ME HEAD!!
That's it, right?
-
Mr. Bill
- Top Producer
- Posts: 709
- Joined: Tue Aug 19, 2008 12:15 pm
- Location: Chicago, IL
Re: Ed Elliott, Step-by-Step Building of 4 Mosrite Custom Clones
And it means that you must install the frets before you add the binding to the neck.
I hope Eddy comes back here, as he was going to add photos of the pickup winding and construction to this thread.
I hope Eddy comes back here, as he was going to add photos of the pickup winding and construction to this thread.
Return to “Mosrite & Clone, Projects, Parts & Accessories Q&A”
Who is online
Users browsing this forum: No registered users and 102 guests