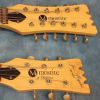
A little more progress. Tonight I cleaned up some less than pretty solder joints and took the next step necessary to stuff the innards into this guitar. I experimented with various spacing for the three toggle switches. 1 1/2 inches seemed to look the best to my eye. I taped off the horn and made a little template to get the spacing perfect.

I decided to take a step approach to drilling through the top of the guitar. I went in the following order; 1/16, 5/64, 7/64, 1/8, 5/32, 7/32, 5/16, 3/8, 1/2.


Crossing my fingers I removed the tape and voilà!

I decided I wanted some bracing under the pickups. The little strip of real estate between the pickups is about 1/2 inches and I am concerned if it took a direct hit that it might cave in. I'm not rough with my guitars, just being cautious. Secondly, the type of pickups I've decided to start with don't need the holes to be as large as they were cut in when I had planned to put in dog ear P90's. Although the pickup rings will cover the holes it didn't leave enough room for the screws to catch enough wood. So, I put in my own little version of trestle bracing.
Both sides.


I then ran my tubes to prepare to install the wiring.

As I started thinking about where to lay the ground wire I decided I didn't want to run it back to the tail piece. That didn't look too easy anyway. I decided to do what many guitars have, such as LP's, and that was to drill a diagonal hole through the wood of the bridge post hole. To make sure I didn't scratch the guitar top with the drill, I took a piece of cardboard like material (this came from the divider in a box of cat food) and taped it to the top.

I drilled a 1/16 hole with the drill and then opened it to 5/64 by hand.

That worked like a charm and Ta-da! Ground wire is in.

I finally got the wiring harness stuffed into the guitar. I can't believe it took about five hours to do so.
I got the pickups soldered into the circuit, mounted to the body, etc. and plugged her in. Much to my surprise, everything worked! It is pretty awesome to hear this guitar make music. There is still much to be done. The Dynasonics sound very weak. Before I start messing with pole heights I'm going to put some shims under both of them to get a bit closer to the strings.
The Filtertron sounded great, albeit quite a bit louder than the Dyna's. Some tweaking will be in order over the next couple of days. I need to start thinking about knobs, etc.
The two Dyna's each have a tone pot and currently the Filtertron does not have a tone pot. I'm still deciding on that.

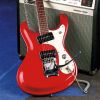
Now you can get a sense of how it will end up looking.

I'm making a couple of spacers to get the Dyna's closer to the strings before I start adjusting pole heights. These are the original Dyna's that came in these guitars. I'll try these for a while to see if I'm happy with them. Next will be binding the two additional cat eyes and looking for knobs. I have a couple of ToneStyler pots and may put one in this guitar. Paint will be the last thing I do and I'll have to decide if I want to tackle that myself or go professional. Perhaps both.
I decided to put a jack plate on, just to be safe.

A little update, but then again, a major update in my eyes! I experimented all day Saturday on the best way to do the binding on the extra cat eye sound holes. I used .060 binding instead of the .090 that I had originally purchased. The first go at it was with a heat gun. It didn't work out too well as the binding would just lay there and then instantly get too pliable. It was difficult to get it to stay in the same plane, if that makes sense. Next I tried boiling water. That didn't work at all. Then I noticed my heat gun had adjustable settings. Before you spew your drink keep in mind I've never used a heat gun other than full blast so it did not occur to me to turn it down a bit. Blondesheimers, I recon.
I played with some scrap material and found that the heat gun performed best on a setting of 7. I also ended up having to make another plywood template to get the shape before trying to glue. I used a disc sander to carefully make the ends meet up nicely. I bought the binding from Stew Mac and as well as the binding cement and binding tape. It says to let it set for 24 hours, but I'll let it go a bit longer before I get the Dremel and shape it all.

The tape came off at lunchtime and ta da! Now I need to shape it a bit. The binding in the original cat eyes are shaped in a curve rather than squared off. I want to match that. Then I have to figure out how to stain it to match the original. Even though I bought cream binding the original binding is yellowed from age and the colors don't match. I'll have to think about this for a while.

Okay, a little bitty update. This was actually more difficult than one might think. I struggled back and forth on what knobs to put on this guitar. There are a lot of cool knobs on eBay, but at the end of the day I decided to stick with my original mission of making this guitar as Gretsch like as possible. So, today the Gretsch G Arrow knobs arrived. I think they look pretty good on here and helps keep it looking like something Gretsch may have built. Oh, it now tips the scales at 7.2 pounds.